Let’s be real – learning how to set up PMU tattoo machine equipment for the first time can feel a little intimidating. All those wires, settings, and hygiene steps? Yep, it’s a lot. But once you get the hang of it, it turns into a calming pre-glam ritual that sets the tone for your entire session.
Whether you’re prepping for your first-ever client or just practicing strokes at home, knowing how to set up PMU tattoo machine gear the right way is a game-changer. This guide breaks it all down – step by step, no stress, no overwhelm.
So grab your favorite gloves, take a deep breath, and let’s walk through how to set up a PMU tattoo machine like a total pro – even if you’re still new to the game.

PMU must-haves: from machines to hygiene heroes prep like a pro.
What you’ll need before you start
Before anything, let’s make sure your beauty station is fully stocked. Having the right PMU tools makes your setup smoother, cleaner, and way more confidence-boosting.
Your PMU essentials:
- PMU machine & power supply: These are your ride-or-die tools. Be sure you’re using a machine designed specifically for permanent makeup (not body tattoo machines).
- Disposable needles or cartridges: Always go for sterile, single-use ones. Pro tip: Round liners (RL) are great for delicate lines (think brows and eyeliner), while magnum shaders (M1) are perfect for fuller, bolder fills (like lips).
- Gloves, alcohol pads, barrier film, and tape: These are your hygiene heroes – protecting both you and your client.
- Optional but helpful: A foot pedal for hands-free control, and a practice skin pad if you’re still building confidence.
Using sterile, single-use tools isn’t just about hygiene – it shows professionalism, care, and pride in your craft.
Step-by-step: How to set up a PMU tattoo machine
Here comes the fun part – let’s set up your PMU machine together, one easy step at a time.
Step 1: Sanitize everything
Clean space, clear mind always sanitize before you glam.
Wipe down your workspace and tools with alcohol or a disinfectant spray. Don’t skip this step – clean space = calm mind. Oh, and always wear disposable gloves from start to finish.
Step 2: Connect your power supply
Plug in your power cord, switch on the power supply, and connect the machine. You should see the voltage display light up. It’s like your beauty machine saying “Let’s do this.”
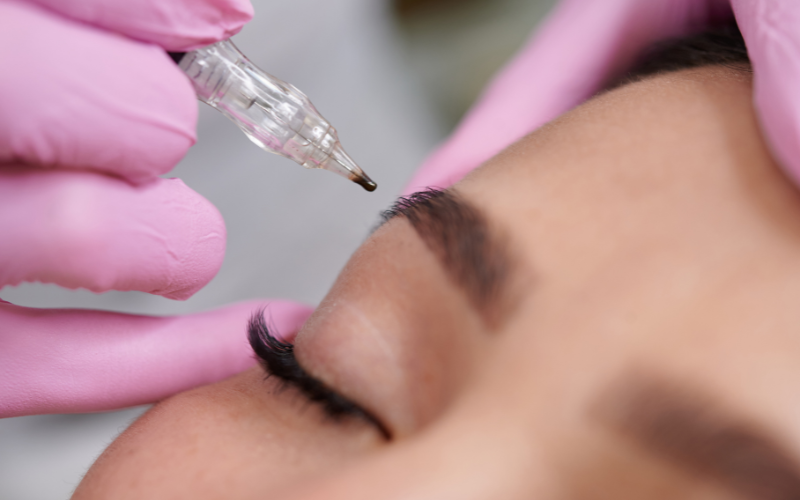
Step 3: Insert your cartridge
Grab a new, sterile needle or cartridge (no reusing ever!). Gently remove it from the packaging and twist it into your machine until it feels snug and secure.
Step 4: Set the right voltage
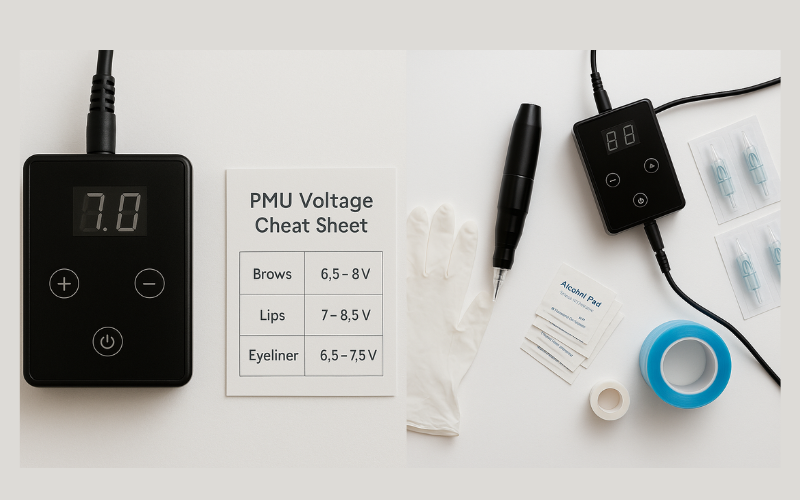
Voltage matters fine-tune for brows, lips, and liner confidence.
Different areas need different vibes – literally. Here’s a quick cheat sheet for voltage:
| Area | Voltage |
| Brows | 6.5 – 8V |
| Lips | 7-8.5V |
| Eyeliner | 6.5-7.5V |
Start lower if you’re unsure, and listen to your machine. A smooth buzz = you’re golden.
Step 5: Adjust the needle length
Depending on your technique and the area you’re working on, set your needle to around 2.0–2.5mm. This is your sweet spot for most PMU work.
Step 6: Wrap it up
Use barrier film or grip tape to wrap your machine. This keeps things clean and helps with your grip (no one wants slippery fingers mid-liner!).
Final step: Quick test run
Turn it on and let it run for a few seconds. If everything sounds smooth and the needle moves evenly – you’re ready to create something beautiful.
Mistakes to avoid (so you don’t learn the hard way)
Even experienced artists mess up sometimes. But knowing what to avoid makes you feel more in control from the start.
Don’t mix up your needle types
Using the wrong cartridge for brows vs. lips can throw off your results and cause unnecessary trauma to the skin. Always match the needle to the job.
Watch that voltage
Too low = pigment won’t stick. Too high = ouch. Use the ranges above as a guide, and adjust slowly if needed.
Make sure your cartridge is really in
If the needle wobbles or loosens mid-procedure? Nightmare. Give it a gentle twist and test it before starting.
Never skip the wrap
Barrier film isn’t optional it keeps things clean, professional, and makes sure you’re not transferring bacteria between clients.
Always test before you begin
A 5-second test run can save you from a ton of stress. Check the sound, vibration, and voltage one last time.
Little habits like these build big confidence.
First-time setup? These tips will help you feel like a pro
Setting up your PMU machine for the first time? You’re not alone, we’ve all been there with shaky hands and 10 tabs open on YouTube. Here’s what really helps:
Practice the full routine beforehand
Go through your entire setup a few times before your first real appointment. It’s like dress rehearsal, no pressure, just flow.
Use a printed checklist
Keep a simple checklist nearby to walk through every step. Even experienced artists use them!
Try it on practice skin
Test, adjust, repeat practice makes flawless.
Before you work on real skin, test everything on a silicone pad. Feel the vibration, adjust your hand pressure, and get used to the rhythm.
Ask a mentor for feedback
If you’ve taken a PMU course, send your trainer a video of your setup. They’ll often catch tiny mistakes you didn’t notice.
You’ve got this just keep practicing
Learning how to set up a PMU tattoo machine is all about finding your own flow and doing it with care. From choosing the right accessories to getting your voltage just right, every detail counts. But don’t stress if it’s not perfect at first.
Take your time. Keep it clean. Practice until it feels second nature. And remember you’re not just setting up a machine. You’re setting the stage for real, lasting beauty.
Want more friendly PMU guides like this? Dive into more tips on the Vivitag blog. We’ve got your back.
FAQ: PMU setup, simplified
How often should I replace PMU cartridges?
Every single time. Cartridges are single-use only always swap them out between clients (and practice sessions too!).
What voltage should I use for brows?
Somewhere between 6.5V and 8V is usually perfect. Start low and adjust if needed based on skin type and pigment flow.
Can I use my PMU machine without a foot pedal?
Yes! Many modern PMU machines have built-in buttons or touch functions. A foot pedal just gives you extra control but it’s optional.
Do I really need to wrap the machine?
Yes, yes, yes. Wrapping helps keep everything hygienic, prevents cross-contamination, and shows clients that you take safety seriously.
What if my machine doesn’t run smoothly?
Double-check your power source, voltage setting, and cartridge placement. If it still feels off, try testing with a different cartridge or reach out to your trainer for help.