So you wanna learn how to do an outline lip shape in lip tinting? Let’s talk! If you’ve ever looked at a pair of freshly tinted lips and thought, “How do they get that shape so perfect?” you’re not alone. I used to wonder the same thing. The secret? It’s all in the outline.
Whether you’re dabbling in DIY lip tinting, exploring semi-permanent makeup options, or just curious about how it’s done, outlining is where the magic starts. It’s not just about tracing the lip line, it’s what gives the final result its symmetry, polish, and pop.
Let me walk you through how I learned to do a clean outline in lip tinting and how you can, too.
Why the Outline Matters More Than You’d Think
A precise outline evens out asymmetry and boosts confidence.
Before we dive into the how-to, let’s talk about the why. Outlining might seem like a tiny part of the process, but honestly? It sets the tone for everything.
- It creates balance – Most of us don’t have naturally even lips. Outlining lets you fix little asymmetries and make everything look more harmonious.
- It’s your guide – The outline is like your lip-tinting GPS. Once it’s in place, shading becomes way easier and more precise.
- It boosts confidence – When you (or your client) see a perfect outline, it’s instantly reassuring. You know you’re in good hands literally.
- It helps with healing – A good outline holds pigment better and heals cleaner, so the final result lasts longer and looks more polished.
What You’ll Need to Get That Outline Right
Think of this like packing your beauty toolkit. Here’s what helps make the process smooth:
- A white pencil or mapping pen (great for sketching the shape)
- Measuring tools (even just a ruler or calipers help with symmetry)
- A PMU machine with a soft touch (nothing too heavy or vibrating)
- Thin needles like 1RL or tight 3RL (these give you control for fine lines)
- A pigment that’s warm-toned and designed for lips (so it heals soft, not grayish)
- Numbing cream (for comfort it’s a must)
- A good aftercare balm (because healing matters)
Step-by-Step: How I Outline the Lip Shape in Tintin
Let’s get into the fun part! This is how I personally approach creating a flawless outline.
White pencil sketch in progress slow, steady, and symmetrical.
1. Start With a Chat (and a Good Look at the Lips): Before anything touches skin, I always do a little sit-down (even if it’s just me, prepping myself in front of the mirror). I check:
- What the natural lip shape looks like
- Any uneven spots or faded areas
- Where the cupid’s bow peaks are
- If the person has any scar tissue or areas that might not take pigment well
- Tip: Snap a quick before photo. It helps to compare later!
2. Sketch It OutLike, This is the longest part of the process, but honestly, it’s worth it. I use:
- A white pencil to lightly trace the center and outline
- Calipers or a string trick to make sure both sides match
- A standing mirror to double-check from different angles
- I always ask the person (or myself) to smile, talk, and see if the shape still looks good when the lips move. If not, back to tweaking!
3. Numb the Area (Yes, It Helps A LOT): Once we love the shape, it’s numbing time. I apply numbing cream and leave it on under plastic wrap for about 20–30 minutes. This makes the outlining part way more comfortable.
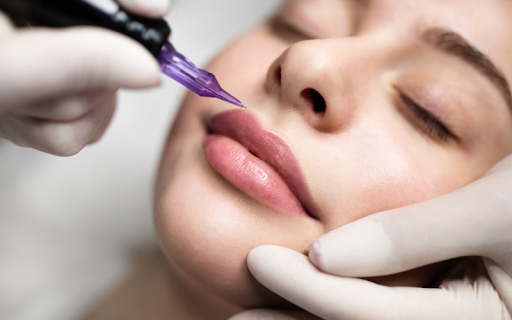
4. Time to Outline! This is where it gets real. I pick a 1RL needle and work in sections, wiping off the numbing cream as I go. Key things I focus on:
- Stretching the skin gently for precision
- Keeping my hand relaxed and the motion fluid
- Staying shallow just enough to get the pigment in, but not so deep that it turns dark or spreads later
- I always check as I go to make sure the line is even and not too harsh.
Outlining with 1RL needle: steady hands make all the difference.
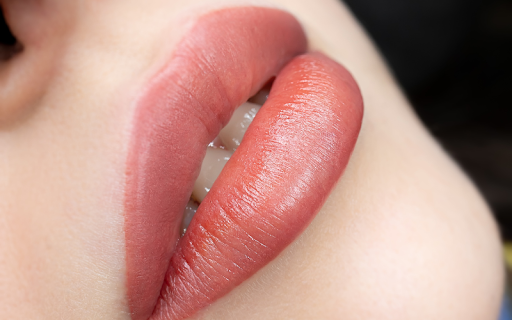
5. Blend It In, Don’t Leave a Ring: Here’s where a lot of people mess up the outline and stop there. That creates a sharp “ring around the lips” look, which I personally don’t love. Instead, I start shading right from the outline inward, gently blending to avoid any harsh edges. It creates that dreamy gradient lip blush look we’re all obsessed with.
6. The Final Reveal + Aftercare Chat: Once the lips are filled and looking fab, it’s time for the reveal! I clean everything gently and show the mirror moment. Before they leave, I always (always!) share:
- Aftercare instructions (gentle balm, no spicy food, avoid touching)
- What to expect during healing (peeling, slight fading, etc.)
- How to book a touch-up if needed
Common Mistakes I’ve Learned (Sometimes the Hard Way)
Let’s keep it real, things can go wrong, especially at first. Here are some I’ve dealt with:
- Outline healed too dark? Probably went too deep or used cool-toned pigment. Use a lighter touch and warmer shades next time.
- That dreaded ring? Blend better from the line inward. Don’t leave it as a standalone shape.
- Poor pigment retention? You might not be stretching the skin enough. A good three-point stretch makes all the difference.
- Swelling got in the way? Work efficiently and use a numbing agent that helps control swelling, like one with a vasoconstrictor.
Master your outline technique with this post: how to do an outline lip shape in lip tinting.
Final Thoughts: Practice Makes Pretty
Learning how to do an outline lip shape in lip tinting is one of those things that sounds simple but takes practice to really nail. Don’t get discouraged if your first few tries aren’t perfect.
Take your time with the shape. Focus on blending. And trust me when that final mirror moment hits and those lips are looking soft, even, and glowy? It’s so worth it.
FAQs (Because You’re Not the Only One Wondering)
What needle is best for outlining?
A 1RL is perfect for clean, defined lines. Want something a bit softer? Try a tight 3RL.
How do I make sure the outline doesn’t look too harsh?
Go light on pressure, keep your pigment tone warm, and blend from the outline inward.
Should I do the full outline before I start shading?
Yes! Doing the full outline first helps lock in the shape so you can shade confidently from there.